- News all the latest
- Theme Park explore the park
- Resort tour the resort
- Future looking forward
- History looking back
- Community and meetups
-
ℹ️ Heads up...
This is a popular topic that is fast moving Guest - before posting, please ensure that you check out the first post in the topic for a quick reminder of guidelines, and importantly a summary of the known facts and information so far. Thanks. - Thread starter DiogoJ42
- Start date
- Favourite Ride
- The Metropolitan Line
- Install the eyes. These were 2 Poundland push lamps with the wiring removed and run down the side. This meant light up eyes.

- Install a hard hat inside and screw to the ferret ball. This gave the ball a comfortable fit to stop it rattling around my head.
- Outer covering- I chose against painting it, as the ball had dents in it that would look less spherical. Instead I opted to cloth the whole thing. This was particularly hard to do without leaving visible seam lines. Eventually using quite a lot of red felt and spray adhesive I got there, with only a small crease at the back. For the ears I sewed together a little felt pocket and stuffed the foam ears in.
- Cover up the mouth hole. This was my visibility so I had to come up with something. I tried hard opaque plastic but it kept steaming up. So I abandoned that for chicken wire cut to the shape of the mouth hole and then attached a piece of net curtain. I did cut this from some curtain from my gran's ottoman and placed it back in, minus a D shape. I believe it's still there and I am yet to tell her what happened to her spare curtain. Sorry Nain.
- Random - Inside I had to shore things up for comfort and to stop things from moving. So lots of spare foam was glued in for comfort. To stop everything from moving, everything was duct taped together for support.
- Add electrical tape to eyes to imply I was indeed a Deadmau5.
- Favourite Ride
- The Metropolitan Line
- Favourite Ride
- The Metropolitan Line

You are using an out of date browser. It may not display this or other websites correctly.
You should upgrade or use an alternative browser.
You should upgrade or use an alternative browser.
The "Look What I Made!" Topic.
Mi-Nigle
TS Member
Wow DiogoJ42. I think I built some IKEA wardrobes once and thought myself handy drilling my own holes for the door handles.
The whole build is very inspiring, however,
a) not sure what I'd build
b) I probably wouldn't be allowed to build it even if I called it the Kinky Claire.
The whole build is very inspiring, however,
a) not sure what I'd build
b) I probably wouldn't be allowed to build it even if I called it the Kinky Claire.
Some of the things I made over the years.
Orville was my favourite, lots of mold making. Latex. Fabric. Plastic pipe and wire and many hours of stress. Everyone loved him tho
There was also much fun had making Cupid Stunts boobs.
Love playing about with latex and silicone fx prosthetics tho

Brilliant. Great theatrical make up there.
I have been involved in the theatre/TV for most of my life. I also had some experience in theatre make up. I used to use Charles Fox in Covent Gardens. I once made a realistic cast of my ex wife's head using alginate and dent stone as well as made a cast of my feet which I made out of latex, all for special effects for my stage show.
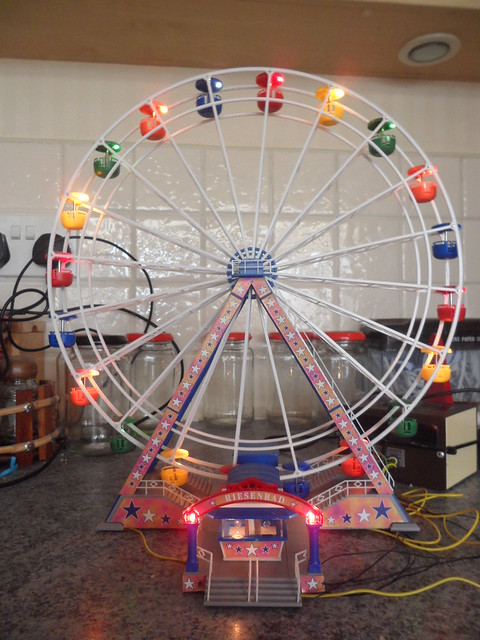
Amazing stuff Roy. I've built a couple of the Faller models myself (Breakdance, Topspin and Wild Mouse. Think I have a couple of unbuilt ones stashed as well), but nowhere near the standard of yours. Mine just take up space and gather dust now.
I've made most of the Faller fairground models once before, but soon learnt that they are better protected in a display case. Most of mine go ruined due to dust and being delicate. They are great models, very cleaver how they get them to move realistically. Can be very fiddly to make, so plenty of swearing involved. They also need a lot of tweaking to make them work. I've currently just build the Faller mouse ride, I originally made one a few years ago. This time, this one will end up in a display case.

Diary build can be found here, you will need to scroll down
http://www.partworkmodels.co.uk/phpBB3/viewtopic.php?f=86&t=6607&start=40
Well, there are still a few final tweaks to make, but it's complete enough to show you. Keep in mind that the flash shows up all the imperfections that you never see with the eye when flying in a darkened room. It also shows up just how much dust has already built up. I need to commission Kelpie to make some dust covers (I already have some “remove before flight” tags to put on them).
The “nose art”.

The dummy circuit breakers.


Details of the port door.

The dummy emergency pitot air shut off.

Various shots on the main instrument panel, with and without flash.


The overhead panel. The “brushed metal” effect sticky back on the “chemtrails” cover is peeling off. No glue seems to counter it's urge to curl. I'm thinking a small screw in each corner might be needed.

The throttles and autopilot panel.

The lower pedestal, rudder and aileron trim, cowl flap levers, and fuel select. There's even a slide out drinks holder in there! At the very bottom is a pair of cut off switches for the bass shakers in the seats, in case I'm ever flying with a friend who doesn't like that sort of thing.

The seat bases.

The inertia reels for the shoulder belts came with a locking lever, so that needed working in to the design.

Pilot seat from the front.

Left lower switch panel, speaker volume and panel lights. The red tape round the battery master is temporary until I can be arsed to paint it properly.

A few wider shots.


I've discovered it is nigh on impossible to expose both the monitors and the panel properly at the same time.


And here's a fewscreen shots“me pointing my iPrat at the screen" during a test flight from Land's End St. Just to Humberside earlier this week.
Preflight checks in Land's End.

Releasing some poison somewhere over Cornwall.

Forward view crossing the Severn estuary towards Cardiff.

Parked up after a successful landing in Humberside.

Finally, here's an image of the type of cockpit that inspired me. (Although this one has a Glass cockpit fitted. I prefer to keep it old school).

Well, there you have it. Naturally, this will never be 100% finished. There's always some new software package to install. One of these days I plan to move the sim in to the spare room (after a major sort and tidy), freeing up the corner of the living room to be Kelpie's long awaited office space. That would probably be a good point to install the co-pilot controls. And of course, that trio of old-but-great-quality 24” monitors could always be updated for something bigger...
That is amazing, Wow! You must be very proud to show this off. Well done!
Last edited:
DiogoJ42
TS Member
Yup, that's the same edition of the mouse that I have. One thing I did do with my Faller models is blast all the bits that are supposed to be metal with some silver spray paint. I also "painted" the cars on my Breakdance with some metallic nail polish Kelpie provided.
I did think when I first got them that it might be possible to dress them up as Rattlesnake, Rodeo and Rameses' Revenge. But I quickly realise that would be far more effort that it would ever be worth! (Am trying to remember what the unbuilt ones I have are. The Octopussy polyp is definitely one of them. Maybe Music Express is the other?
Meh, I used to be a big builder of plastic kits, but I've not touched one in years. Last one I completed was the Revel Victor in tanker configuration. I went to town super detailing the cockpit and undercarriage with scratch built stuff... then realised none of it would ever be visible. I started building the Airfix Vulcan. It's currently sitting in it's box, along with a load of resin and brass detail parts. My "never got round to starting" pile includes a Valiant, TSR2, Nimrod, lord knows how many other cold war icons, and a few airliners.
Much as I used to love a good kit in my younger days, I think now my hands would probably be too shakey to do them justice. Let this be a lesson kids: decades of booze and drugs may not harm your life... but it can hamper your modeling skills!
Too many hobbies, not enough time. Or money.
(That reminds me, I have a euromillions ticket I need to check.....)
bluesonichd
TS Member
Mmmmm looks tasty. Can’t believe you didn’t share with the forum tho.
Maybe not quite as impressive as previous posts but hey...I made them! And they were good...
Sent from my iPhone using Tapatalk
Oh well guess I’ve been saved doing extra steps
#MyBigBelly
Rojo
TS Member
Unfortunately I lost most of my photos for this so I will have to make do with what I have and try to set the scene a little.
A few friends and I decided to dress up for a weekend at creamfields. Deciding I wanted see Deadmau5 more than anyone that weekend, I decided to create a Mau5head.
Not thinking it could be done in time my friends set me a forfeit.

So it with the thought of being Alan for the weekend, I raced ahead with a very rough and quick paper mache prototype.

So with lots of newspaper and duct tape firmly held together, I finally had my measurements.
I then had to find a receptacle big enough to house my meatball of a head. After much searching I found a Ferret ball that would do the job nicely. I then cut the holes measured from the prototype version.

Next up was to find the ears. Using my perfectly measured model I set about making the ears. Using some foam I acquired from a friend's sofa I measured and cut the ears shape. Later on I glued some screws into the foam to attach to the ferret ball.


Next up was to create the eyes. I made some cardboard ones first to trace the holes. These were the final cuts and I was really unsure during the cutting if the ball would shatter, especially between the eyes and the mouth.

Luckily everything held. Unfortunately this is where I lost most of my pictures
So the outstanding work was to;
So the finished product ended up like this.

With light up eyes...

So all finished the night before creamfields 2012. Phew!
Sadly the Sunday was rained off and I never got to see Deadmau5 It did survive the mud and the rain somehow. It also had some terminal damage on the waltzers and duct tape only managed to fix this until Monday, when he was responsible recycled
so I will have to make do with what I have and try to set the scene a little.A few friends and I decided to dress up for a weekend at creamfields. Deciding I wanted see Deadmau5 more than anyone that weekend, I decided to create a Mau5head.
Not thinking it could be done in time my friends set me a forfeit.
So it with the thought of being Alan for the weekend, I raced ahead with a very rough and quick paper mache prototype.
So with lots of newspaper and duct tape firmly held together, I finally had my measurements.
I then had to find a receptacle big enough to house my meatball of a head. After much searching I found a Ferret ball that would do the job nicely. I then cut the holes measured from the prototype version.
Next up was to find the ears. Using my perfectly measured model I set about making the ears. Using some foam I acquired from a friend's sofa I measured and cut the ears shape. Later on I glued some screws into the foam to attach to the ferret ball.
Next up was to create the eyes. I made some cardboard ones first to trace the holes. These were the final cuts and I was really unsure during the cutting if the ball would shatter, especially between the eyes and the mouth.
Luckily everything held. Unfortunately this is where I lost most of my pictures
So the outstanding work was to;
So the finished product ended up like this.
With light up eyes...
So all finished the night before creamfields 2012. Phew!
Sadly the Sunday was rained off and I never got to see Deadmau5
It did survive the mud and the rain somehow. It also had some terminal damage on the waltzers and duct tape only managed to fix this until Monday, when he was responsible recycled
Last edited:
Rojo
TS Member
Thank you Diogo. Your handiwork on the simulator is insane (the good kind). It's amazing how a labour of love can really push your creativity. Completely true about duct tape. Its great for covering up mistakes too!
I'm debating whether to make an arcade table at some point but apparently finishing the spare room is more important
Loving all work in here so far. I look forward to seeing some more from you all!
I'm debating whether to make an arcade table at some point but apparently finishing the spare room is more important
Loving all work in here so far. I look forward to seeing some more from you all!
DiogoJ42
TS Member
Just a quick update on my sim. I finally got round to fitting controls to the copilot's side. I got them ages ago, but was waiting for the weather to cool off a bit before I started doing DIY.

Typically, after I'd put the whole thing back together and booted it up to test things out, there was ONE single plug I'd forgotten to reconnect. So I had to take the lid off it and ferret around at akward angles to get that working. Got there in the end though.
@Kelpie, meanwhile, has knocked up some lovelly dust covers for the yokes and throttles:

I love them, they are perfectly ugly!
A few more tweaks have been made. Mostly daft things like "secret" audio triggers on some of the spare, unmarked buttons.
And I've managed to find a genuine Beechcraft yoke faceplate on fleabay for a reasonable price, which I plan to stick on the front of the copilot's yoke when it turns up:

At this point, pretty much the only physical thing I can think of that I'd like to add would be a "wet compass" on top of the glareshield. I've only found a single company that makes one, and while it's obviously good quality, the price is a bit steep, even for this project!
Maybe one day...
Typically, after I'd put the whole thing back together and booted it up to test things out, there was ONE single plug I'd forgotten to reconnect. So I had to take the lid off it and ferret around at akward angles to get that working. Got there in the end though.
@Kelpie, meanwhile, has knocked up some lovelly dust covers for the yokes and throttles:
I love them, they are perfectly ugly!
A few more tweaks have been made. Mostly daft things like "secret" audio triggers on some of the spare, unmarked buttons.
And I've managed to find a genuine Beechcraft yoke faceplate on fleabay for a reasonable price, which I plan to stick on the front of the copilot's yoke when it turns up:
At this point, pretty much the only physical thing I can think of that I'd like to add would be a "wet compass" on top of the glareshield. I've only found a single company that makes one, and while it's obviously good quality, the price is a bit steep, even for this project!
Maybe one day...
DiogoJ42
TS Member
Decided it was about time I got myself a pilot’s log book for my sim. Luckily, FSX keeps a record of every flight I’ve ever made, so I’ve retroactivly filled in everything since Kinky Kelpie came online.
Took a bit of deduction to work out what was a proper “flight” and what was just “testing something out”, but I got there in the end.
I also dug out my 3822 (Air Cadet log book) to add in the rather pathetic 1.2 hours I managed to clock up flying a real plane in my youth.
Since November last year, I’ve flown about 40 hours. Must try harder.

 SAM_6326
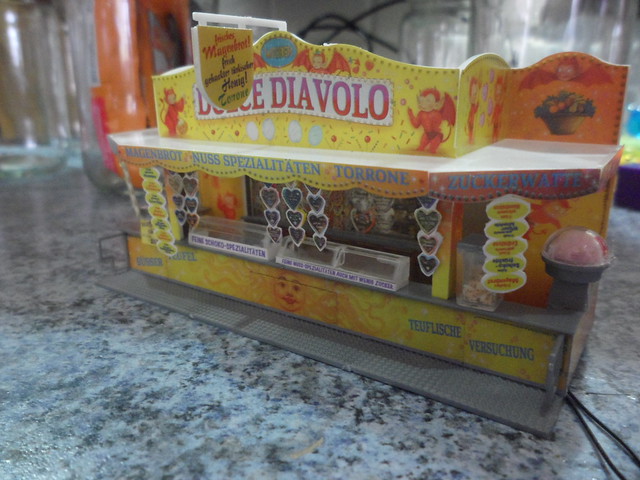 SAM_6759
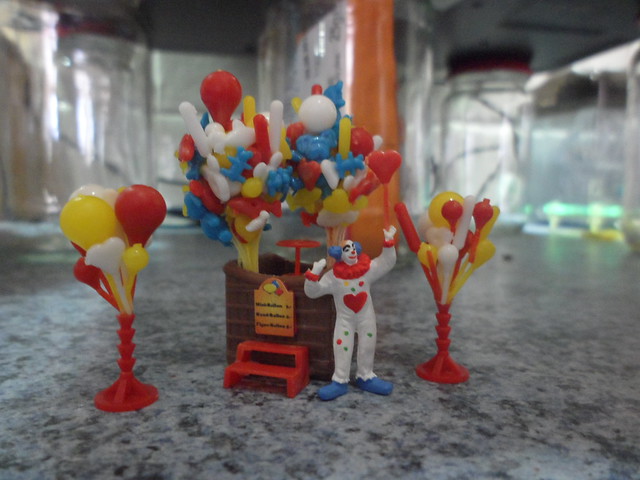 SAM_6757