• ℹ️ Heads up...

    This is a popular topic that is fast moving Guest - before posting, please ensure that you check out the first post in the topic for a quick reminder of guidelines, and importantly a summary of the known facts and information so far. Thanks.

Nemesis 3D Printed Model

Wildboy1983

TS Member
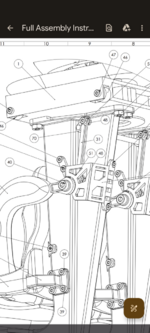
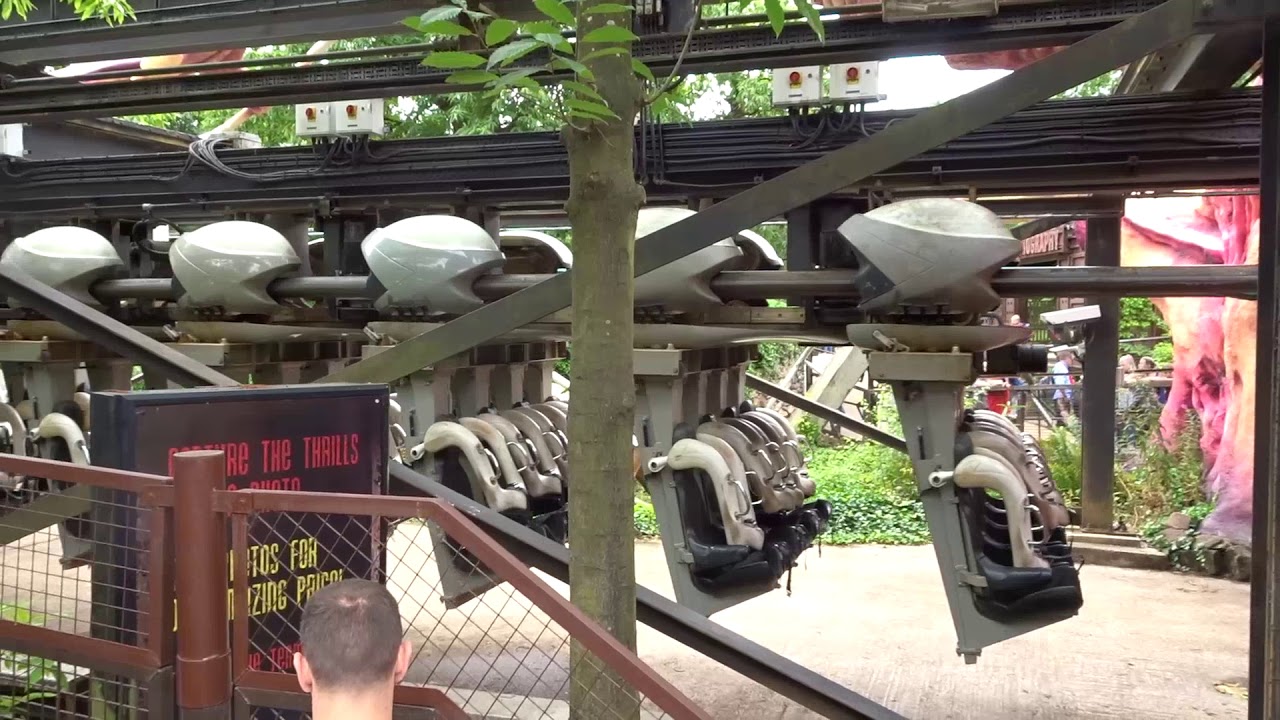
Hi everyone I am currently in the process of making a 3d printed model of Nemesis and I need help with a few things. I am currently working on the restraint mechanisms and I need to know if the arms that sit behind the seats are steel or painted the same colour as the chassis. Also would like to know if the nemesis train features a mechanism guard that is found on later bnm models or if this is not featured on nemesis.

If anyone has close up photos of the wheel bogies then that would also be really helpful. Infact any close up pics of the train would really help me out a lot.

Alex
 
  • Like
Reactions: Tom
It all depends on what you mean by the "arms". The back-bone of the seats & the side arms at waist level are all steel, painted in the same grey as the rest of the train chassis. Obviously they have the black seat-back / sides attached to the steel. The Nemesis trains have had the mechanism guard retro-fitted. The track also had the feed wheel guards retro-fitted too in the early 2000's to secure a feeder wheel should a bolt sheer.

If you are referring to the arms on either side of the harnesses, then these are gas-struts. The main bit is black, with a shiny steel bit that expands / compresses. Believe me, without these the average guest would have big problems lifting the harness up.

I have got very close up photos of the wheel bogies on Nemesis - I'll have to delve into the old Windows PC for them though.
 
Thank you for your reply and the offer of help with pictures. That would be really useful and interesting.

The item I am currently deciding on a paint colour for is number 31 in the picture which by the sounds of it represents the gas strut so I assume this should be black rather than grey although it is just a steel arm on the model... Decisions..
 

Attachments

  • Screenshot_20230405-214916.png
    Screenshot_20230405-214916.png
    394.6 KB · Views: 78
That picture doesn't look quite right. On Nemesis there is the locking release mechanism at the top which is unpainted metal. The gas strut is lower down and black.

Zoom in on this thumbnail from YouTube video
maxresdefault.jpg
 
That picture doesn't look quite right. On Nemesis there is the locking release mechanism at the top which is unpainted metal. The gas strut is lower down and black.

Zoom in on this thumbnail from YouTube video
maxresdefault.jpg

Ah yes I see what you mean. The model has taken artistic licence in order to make the restraints move mechanically. I think I will go for the chassis grey on the model in that case.

Will be interesting to see how this project works out. Keep us posted.

Thanks for your interest, yes I will post progress as it happens. Honestly it's been a massive undertaking already and I only have a bunch of parts for one seat so far.

I decided that I wanted a model rollercoaster but as you will know, there isn't really a Market for that type of thing over here. I decided to buy the plans for a 3d printed model and get someone to print it for me. Needless to say I misunderstood the work involved and ended up buying a 3d printer to do it myself.

Fast forward 2 months of learning through failed prints and I'm now putting together my first seat. I want it to be just right so I am sanding down each piece and filling and undercoating before sanding then undercoating again and repeating twice with the top coat. This is all new to me, I am not a modeller and I'm in way too deep but I am enjoying it and keeping my eyes on the prize at the end.

I'll hopefully have an update to share soon.
 
I had a spare afternoon today so I thought I would share my first update with anyone who is interested.

I tasked myself with completing a full and finished seat. The finished model will have 12 seats over 3 rows but I wanted to follow the process through to completion on one seat to see how much post production is required with sanding and how easy everything comes together.

PXL_20230407_152017788.PORTRAIT.ORIGINAL.jpg

Overall I am happy with the result. The 3d print didn't come out great so it needed a bit of filling and sanding before having two layers of primer throughout. Then there are two layers of spray on the chassis and 5 layers of painted acrylic on the restraint. The tolerances are very tight so it took some gentle widening of the screw holes with a drill before I could fit the tiny bolts in. There are 872 for the complete model!

PXL_20230407_152149254.PORTRAIT.jpg

The thing that stands out to me is the print layers showing especially on the restraint so I will make sure I sand the next ones more aggressively but with each individual piece needing sanding of every surface I have to balance against the available time to put towards this.

PXL_20230407_152137571.PORTRAIT.jpg

My next mission is to get the remaining three seats done and bolted to the main chassis which will be my next update but in the meantime I have a long slog of post production to get the pieces ready to paint...

PXL_20230407_124206422.jpg
 
Why have I got visions of @rob666 doing this with paper mache?
This is really cool though, such great attention to detail. Looking forward to seeing how the full model turns out
 
Too sloppy, more plasticine or bakeable modelling clay.
...or putty and a paintbrush.
But good work mate, keep it up, and keep posting progress.
 
Would it be easier to fill instead of aggressive sanding? Then gently sand between layers to key it? I am unsure how well paint sticks to the plastic?
 
Finally I have reached a milestone. The first four seats are bolted to the chassis.

PXL_20230410_083948180.jpg

It was a big undertaking to clean up the remaining seats ready to paint and when I had finished spray painting I decided that the print layers were too visible on some parts so I took some advice from the forum and filled them over before respraying again. Our green house Made for a good spray workshop.

PXL_20230416_111516587.jpg

Having worked on one seat to completion it made it easier to put the rest of the seats together. Well here it is, my progress so far...

PXL_20230416_183349682.PORTRAIT.jpg

PXL_20230416_183356915.PORTRAIT.jpg

I realised early on that this thing would be pretty big but actually it's huge!

PXL_20230416_183554852.PORTRAIT.jpgPXL_20230416_183458571.PORTRAIT.jpgPXL_20230416_183548377.PORTRAIT.jpgPXL_20230416_183706772.PORTRAIT.jpg

The layer lines are still visible so I'm going to make this the rear row and focus more on filling for a smoother finish for the remaining two rows.

I haven't managed to get a successful print of the handle bars yet as they are just too fine to print so I may have to either bend a bit of filament into each receptor and be done with it or try and create a 3d printed version that is slightly oversized but still in keeping with the real ones. I also need to connect all the restraint mechanisms to each other but I have left myself zero tolerance so still working on that.
The model uses a ton of tiny M2 bolts which are really tricky to work with and pretty expensive but they do look smart.


PXL_20230416_183752691.PORTRAIT.jpg


The next project is to get the wheel bogies and everything else on top done. I'm super excited to get into this next part. Time to fire up the printer again!

PXL_20230416_183715523.PORTRAIT.jpg
 
Mes curious what scale are you working to as if its 1:16 i may beabe to supply your track work

Thank you for the offer. The model is 1:10 so a bit bigger than that. I have a model which I think I will need x2 or 3 to fit the 3 cars onto. Here is a pic of the current track piece. Im not totally happy with it because it does not feature the triangular pattern shape around it and I would also prefer the track to be curving and twisting to add a bit of interest but I really do not know how to bend a 3d model whilst retaining the correct sizing. If anyone can help or has some pointers I would be really grateful.

Screenshot (63).png
 
I think you may struggle in that 3d modeller, it seems very basic.


This is a two hour long video, but there are plenty of other shorter ones on Youtube.

I've specifically chosen Blender, because it is a completely free and extremely powerful 3d modelling application. It is nearly up there in terms of capabilitys as some of the industry titans.

As long as the modelling software you need for your printer allows imports of 3d models, you should be good to go.

Have a look on Youtube, there will be tutorials specific to B&M style track too.
 
Thank you for the offer. The model is 1:10 so a bit bigger than that. I have a model which I think I will need x2 or 3 to fit the 3 cars onto. Here is a pic of the current track piece. Im not totally happy with it because it does not feature the triangular pattern shape around it and I would also prefer the track to be curving and twisting to add a bit of interest but I really do not know how to bend a 3d model whilst retaining the correct sizing. If anyone can help or has some pointers I would be really grateful.

Screenshot (63).png
Should be simple enough to make in 1 meter sections (thats what steel bar i have in stock is lol)
 
Well If that's a serious offer to make some track then hell yeah I'll take it.

Progress has been slow on finishing the first carriage due to a lack of time but I hope to get it completed this weekend.

PXL_20230504_190043065.jpgPXL_20230506_144422666.jpgPXL_20230514_114857356.jpgPXL_20230514_120033232.jpg
Cools i just need 2 key dimensions from you the distance between from the bottom of the top wheel and top of the bottom wheel (calculations from scaling the tube down is pushing 10mm but could be wrong) there really isn't a true drawing out there as there only guidelines...
And the centres between the trucks so i can make the spar sections from the box section
Also would you want it on the flat, on a bank or inversion?
 
Thanks so much for offering to help with this. Of course I will cover costs.

I have printed a section of track to show the distances below PXL_20230519_174205307.jpg

If I have a limitless shopping list for the track it will ideally be curving up as well as twisting opposite ways by 30 degrees each side ish. Frankly I have no idea how you would do that so curving would be enough if twisting is too much to add I have tried to draw what I mean but I really cannot draw.

16845186580353809696142393771539.jpg


The track length needs to be 40cm in length to accommodate the three cars with a little room each end. Although I would like it longer than that I don't want it to look incomplete with missing carrieges. (Or be tempted to add more) lol
So a straight to banked curve
Or inline twist set up?
 
Top